|
|
 03-18-2009, 10:36 PM
|
#2
|
Location: Brantford, Ontario
|
Re: Armada Predacon to Beast Wars Transmetal Megatron - Retrofit - Work in Progress
First I'll start off by saying that the brown plastic on Beast Wars Transmetal Megatron is absolute crap.
Its brittle on the level of that infamous gold plastic found on a number of other Transformers.
No Beast Wars Transmetal Megatron figures are spared of this condition to my knowledge.
===Edit:
Quote:
Originally Posted by Badgertron

The japanese BW Metals version of TM Megs is immune to GPS, just thought I'd pass that on  |
===Edit: So there we go. There is a version safe from the ravages of GPS. If any of you out there want a safe figure you don't have to work with, there's one out there. By the way, I think this GPS should be renamed to cosmic rust.
But there is hope for all those who want to have a displayable figure that can be posed and even transform.
That hope lies in the resculpt released in the Armada series. Armada Predacon.
Originally when I bought Predacon, it was merely a placeholder for Megatron until I found one.
After a few years, I ended up purchasing a MISB Beast Wars Transmetal Megatron for a reasonable price.
Time passed and I eventually decided to open the box and have him take his rightful place. But to my horror, within about 20 seconds of starting to transform him, parts started to shatter and i was left with a broken figure. That and a few fingers full of brown plastic splinters.
Needless to say I was both saddened and infurated about the whole ordeal. I figured it was actually a knock-off, or was previously broken and glued back together, then packed off into a box and passed off as MISB. I'd have to get another one.
So after checking on the boards and a few other webpages, I found out about the brown plastic nightmare. Looks like I wouldn't be able to buy one after all.
But then I got to thinking... Armada Predacon's got the same sculpt. And the lighter brown was in all the right places. In theory it could be done.
At first the process seemed straightforward. I'd just swap the parts and be done with it, paint it later.
Of course, there were a few snags. I found myself having to keep some of the mismatched brown plastic on the retrofitted figure. That, and the shoulder pieces had some issues.
I asked for some advice on the board, got some good feedback too.
But after some thought, I decided to restart the whole process and document it for others that may try to do the same thing.
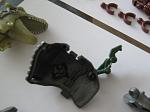
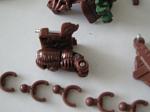
Here's a couple of images from the pre-documented process. Just to give you an idea on how far I got.
Retrofit TM Megatron - Take 1 - Robot Mode

Retrofit TM Megatron - Take 1 - T-Rex Mode

Retrofit TM Megatron - Take 1 - Extra Bits

Last edited by Shepp; 03-21-2009 at 09:09 PM.
|

|

|
|
03-18-2009, 11:17 PM
|
#3
|
Location: Brantford, Ontario
|
Re: Armada Predacon to Beast Wars Transmetal Megatron - Retrofit - Work in Progress
Step 1 - Take apart Beast Wars Transmetal Megatron

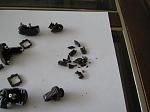 
There aren't any pictures for this part, since I had both figures apart long before I though to picture document the process. Sorry.
Get some white pieces of paper and do this on a level stable area that won't be disturbed.
Word of warning - there will be splinters. Keep a pair of tweezers and a first-aid kit handy.
As you take things apart, put them down on the white pieces of paper.
Set aside the tail for now.
Take apart the legs first, separating the brown (useless) parts from the usable parts.
Don't take apart more than you need to, and keep screws and pins near the parts they're associated with. Reassemble bulk parts that will go into the keep piece of paper.
Take apart the waist and split the parts up as you did the legs. Do not take apart the whole section that connects the read waist to the hip plate fan sections. we'll get to those later.
Unscrew the gear on the bottom of the torso and remove the silverish plate that connects to the tail anchor. Remove the pin and the brown bit.
Unscrew the biceps and put the forearms into the useable pile.
Remove the T-Rex head, take out the small brown bit at the back of the neck.
Pop the robot head out of the neck plate.
Now you should be left with the torso, or however much of it is left.
Its at this point that the shattering begins.
If you're feeling adventurous, carefully remove the pins holding the sides to the front of the torso as best you can.
There's a pin going horizontally across the chest, also carefully remove that as best you can.
Now you have the neck plate separated from the torso. Remove the pin and keep it with the neck plate portion.
I've taken apart the tail, but I wouldn't suggest it at this time. You could always do it later. I'll go into my reasoning later.
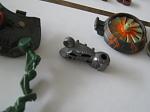
There are some images of what your pieces of paper should look like at the top of the post.
You may want to store the keep and go parts in separate ziplock plastic bags. It really helps.
Nest Step, do the same with Armada Predacon.
Last edited by Shepp; 03-19-2009 at 11:03 PM.
|
|
|
|
|
03-19-2009, 01:42 PM
|
#4
|
Location: Brantford, Ontario
|
Re: Armada Predacon to Beast Wars Transmetal Megatron - Retrofit - Work in Progress
Step 2 - Take apart Armada Predacon

Ok, there are a few differences here when dismantling Predacon.
The legs are more or less the same. As is the waist.
Set the rear half of the waist aside, just like with Megatron.
At this point we come across difference number 1.
The waist rotation joint attached to the torso.
Ok, this here is secured in with a rivet instead of a screw like on Megatron. This means we can't remove that green plate that connects to the tail anchor at this time.
We'll leave it alone and come back to it later.
Remove the tail anchor by popping out the pin and keep it and the pin together.
Unscrew the biceps and remove the forearms just like on Megatron.
Dismantle the T-Rex head, and pop the robot head out of the neck plate.
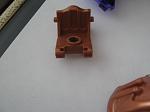
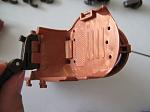
At this point you should be left with the following pieces still connected together.
The torso should have the green plate that connects to the tail anchor. It should also have the robot's sides that connect to the robot shoulders. In addition, it should also have the small L shaped piece that connects the torso to the neck plate.
At this point we'll come across difference number 5 (ok, I know I skipped a few numbers, but I'm covering all the differences in the next step)
The T-Rex mode shoulder plates don't have pins to hold them in place. They simply pop on to the torso. So simply but carefully pop them off.
Here's where an optional step comes into play.
To exchange the Predacon neck plate with the Megatron neck plate, you'll have to carefully remove the pins holding the robot mode sides.
I'd advise against removing these pins. The area is tricky to work with, and if you mess it up you'll break the figure.
I lucked out with mine, I guess I was feeling a little more brave with my amature abilities at the moment.
If you choose to skip this optional step, the only major difference will be a final product with Predacon's neckplate. It'll function just the same, but won't match any other colour on the final figure.
Once more with the tail assembly. I chose to take that apart, but I'd suggest leaving it alone for now.
Once you have your Armada Predacon apart, it should look like the picture I've attached at the top of the post.
You'll notice the lack of broken pieces and lack of crumbs or splinters.
You may want to store the keep and go parts in separate ziplock plastic bags. It really helps.
Last edited by Shepp; 03-19-2009 at 11:02 PM.
|
|
|
|
|
03-19-2009, 02:07 PM
|
#5
|
Location: Brantford, Ontario
|
Re: Armada Predacon to Beast Wars Transmetal Megatron - Retrofit - Work in Progress
Step 3 - Differences Between the sculpts.
This will have quite a few attachments at the end of the post. I may have to split it up to fit them all.
At first it would seem that Armada Predacon is simply a re-release of Beast Wars Transmetal Megatron, with some Mini-Con pegs thrown on.
Not so, there are some interesting differences between the figures.
=== First difference - Waist Rotation Joint

As noted before, the method chosen to fasten the gear to the bottom of the torso is different.
Megatron uses a screw, but Predacon uses a pin.
Armada Predacon's is more secure. Posing the problem of removing it to swap the tail anchor plates.
=== Second difference - T-Rex Hip Plate Rotation Rivet
 
 
Here's another difference that may cause issues.
On Megatron, the hip plates are mounted onto the rear waist assembly using a rivet. However, on Predacon these same parts are fastened using a long pin.
Now this may have been done for ease of assembly, or for lower cost, or for any number of reasons.
The pin more than likely will be easier to remove from Predacon than it is from Megatron.
Last edited by Shepp; 03-19-2009 at 10:26 PM.
|
|
|
|
|
03-19-2009, 10:26 PM
|
#6
|
Location: Brantford, Ontario
|
Re: Armada Predacon to Beast Wars Transmetal Megatron - Retrofit - Work in Progress
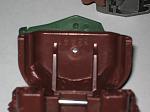
=== Difference 3 - Neck Plate Pin Slots
 
Here's something very strange. On Megatron you can clearly see some slots that make sense. The slots are uniform compared to most I've seen to accommodate pins. The pin here is pretty standard, with the rough bit at one end to anchor it.
On Predacon however, these slots are missing. But more puzzling than that is the pin. It seems that the pin (which I've yet to remove) is sitting loose in neck plate, but rotates with the L shaped piece. It seems that the rough bit to anchor this pin is located closer to its center, somewhere in the L shaped piece.
=== Difference 4 - Elbow Joint Hole Size


Here's a minor nuisance in swapping the parts.
It seems that the hole size for Megatron's forearms is slightly larger than the hole on Predacon's forearms.
Now this is bad, but it could be worse. At least the hole difference is in the right direction. In prior tests, Megatron's forearms will fit on Predacon's biceps, but they sit loose.
=== Difference 5 - T-Rex Shoulder Plate Mounting Pin

This will definitely be a nuisance. On Megatron, these shoulder pieces are held in place with pins. This may not seem like a bad thing, but they're very VERY difficult to remove (I've yet to do this, and I've applied enough force to risk buckling the pieces).
Predacon's T-Rex shoulder plates just clip on. Luckily, the holes remain in Predacon's torso shoulders, so I'm sure that once the pins are removed from Megatron's pieces, they should fit just fine.
Last edited by Shepp; 03-19-2009 at 10:38 PM.
|
|
|
|
|
03-19-2009, 10:38 PM
|
#7
|
Location: Brantford, Ontario
|
Re: Armada Predacon to Beast Wars Transmetal Megatron - Retrofit - Work in Progress
=== Difference 6 - Tail Ball Joint and Handle Size


Ok, this right here is why I've told you all out there not to mess with the tail yet.
The parts are easily swappably, but Predacon's brown tail ball joint bits are just that much smaller than Megatron's.
The tail stays together just fine with the swapped parts, but it is very loose. The whole thing just flops around. Same with the handle.
Good news is that if you want to keep Megatron's tail as is without swapping parts, it should do perfectly fine. The brown plastic doesnt even look like its worn down in the tail.
I myself will be swapping the brown parts and then dealing with it later, but the tail decision is up to you. I mean, I'm hoping to completely eliminate the brown plastic on the Megatron retrofit.
An other note, Predacon's head has a slightly smaller ball joint than Predacon. Since this doesn't have to support anything, I wouldn't worry about it.
=== Difference 7 - Fan Blade Mounting Pins

Ok, this is a difference that I'm just noting because its there.
Megatron uses pins to keep the fans in place on the T-Rex hip plates, while Predacon's just clip in.
=== Difference 8 - T-Rex Hip Plate Sculpt

Another difference that doesn't change a thing with the retrofit.
Predacon's plates have extra little plastic support on the inside.
Last edited by Shepp; 03-19-2009 at 10:45 PM.
|
|
|
|
|
03-19-2009, 10:46 PM
|
#8
|
Location: Brantford, Ontario
|
Re: Armada Predacon to Beast Wars Transmetal Megatron - Retrofit - Work in Progress
=== Difference 9 - Robot Shoulder Mounting Screw


Megatron uses screws to keep the robot mode shoulders connected to the torso sides. Predacon uses pins.
=== Difference 10 - Elbow Joint Screw Size
Here's something related to another difference. The screws for Predacon's elbow joint are significantly smaller than those on Megatron.
The main reason for this is that the forearm hole at the elbow joint is smaller on Predacon.
=== Difference 11 - Paint Apps


Ok, another obvious one. Predacon and Megatron have different paint apps. This will be fixed much later in the process.
=== Difference 12 - Brown Plastic Shade
This one causes a visual difference that will be noticed, but I don't think the lighter shade of brown really causes any problems, providing that you can't see any of the original darker brown anywhere on the figure. If its uniform, it should be fine.
=== Difference 13 - Mini-Con Pegs
Ok, I didn't bother taking any pictures of this simply because its a no-brainer. Predacon's got them, but Megatron doesn't.
Last edited by Shepp; 03-22-2009 at 10:32 AM.
|
|
|
|
|
03-19-2009, 10:52 PM
|
#9
|
Location: Brantford, Ontario
|
Re: Armada Predacon to Beast Wars Transmetal Megatron - Retrofit - Work in Progress
Ok, with the differences out of the way, the next step to tackle is assembly and solving some critical snags. Those will be tackled in the next post tomorrow.
Oh, and if anyone wants to make any comments or ask any questions in this thread, feel free.
|
|
|
|
|
03-21-2009, 07:40 PM
|
#10
|
Location: Brantford, Ontario
|
Re: Armada Predacon to Beast Wars Transmetal Megatron - Retrofit - Work in Progress
Update
Ok, I've finally removed the pins from the Megatron T-Rex mode shoulder plates. It took some gripping with pliers and then turning and wiggling to get them out.
Once removed, they're pretty much like any other pin.
I also did a test fit into Predacon's torso, and it fits pretty well.
My only concern about that connection is that the motion is very tight. I was worried about breaking the joint due to stress but it looks like it should be good.
Next part of the update, I've removed the rear waist pieces from the hip plate assembly.
Once the torso rotation gear is worked out, the bottom half of the figure can be built all the way up to the torso. I can then leave the hip plate assembly until later.
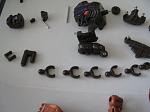
Here's a pic of what I've done for this update.

Last edited by Shepp; 03-21-2009 at 07:43 PM.
|
|
|
|
|
|
 Posting Rules
|
You may not post new threads
You may not post replies
You may not post attachments
You may not edit your posts
HTML code is Off
|
|
|
|
|
Donate to Cybertron.ca |
Donations keep this site running, thanks for your support. More details here.
|
|