Cybertron.CA - Canadian Transformers News and Discussion
Go Back   Cybertron.CA - Canadian Transformers News and Discussion > Transformers Discussion > Transformers General Discussion

Reply
 
Thread Tools
Old 09-24-2014, 10:59 PM   #1
Nazarite
Masterpiece Collector
Nazarite's Avatar
Join Date: Jul 2013
Location: Nova Scotia
Posts: 299
Post Hasbro MP-09 Masterpiece Rodimus Shoulder Repair.

So, like a lot of people who own Hasbro's MP-09 Masterpiece Rodimus, I lived in fear. Fear that I would go to my display case and find the arm of my beloved masterpiece figure detached and at his feet.

Every time I decided to transformer him from robot mode to alt-mode or vice versa, I would extend the greatest care that one can possibly muster. It was during one of those moments after a delicate shoulder adjustment that I found a piece of his shoulder joint in my hand. Just a tiny fragment yet upon inspection I realized that another larger fragment was missing. The arm remained attached, but just barely.

"FŬʯċȻķƘĶƙķĸ!!!!!!"

A couple of months passed and every day I would look to see if the arm was still attached. Furious with myself for even touching the damn thing in the first place. Loving and and hating him all at the same time.

One day while reading posts on the Facebook 'Transformers Masterpiece Collectors Group' I happened upon a post about replacement parts for MP-09 such as knees and shoulders. I promptly ordered a set of shoulder joints in the hopes of repairing the ID10T child.


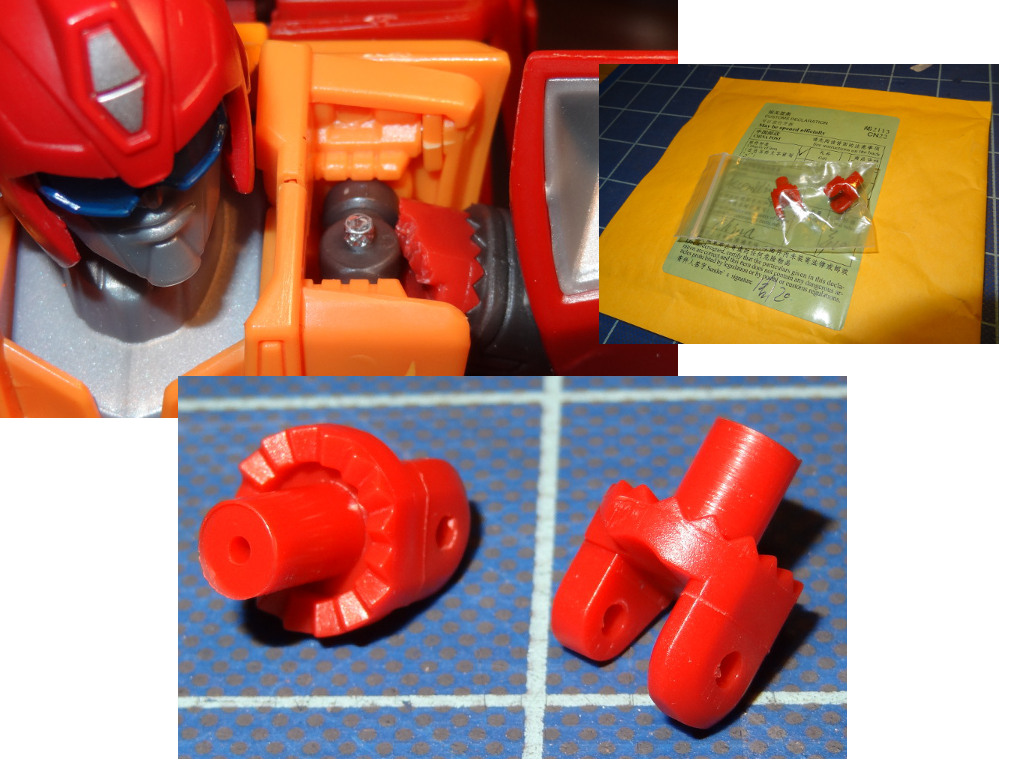
The parts arrived today via China Post and took about 3 weeks to arrive. The parts are molded parts and not 3D prints. The quality seems good with the color a close match to the original. The finish is more of a matte than the more glossy original but nothing that concerned me.

I started by gently removing the arm, making sure not to damage anything else.


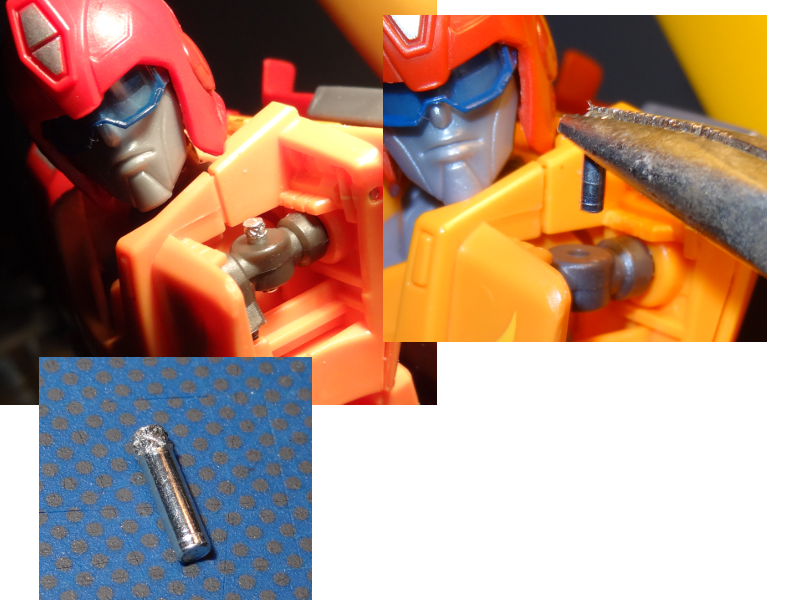
I removed the shoulder pin noting a small knurled section on the top end of the pin.


I removed the screws holding the top part of the arm together and noticed the lower part just below the wheel is held with a pressed metal pin and would not move without considerable force. I opted to leave it and was able to separate the two sections enough to get the shoulder joint section out.

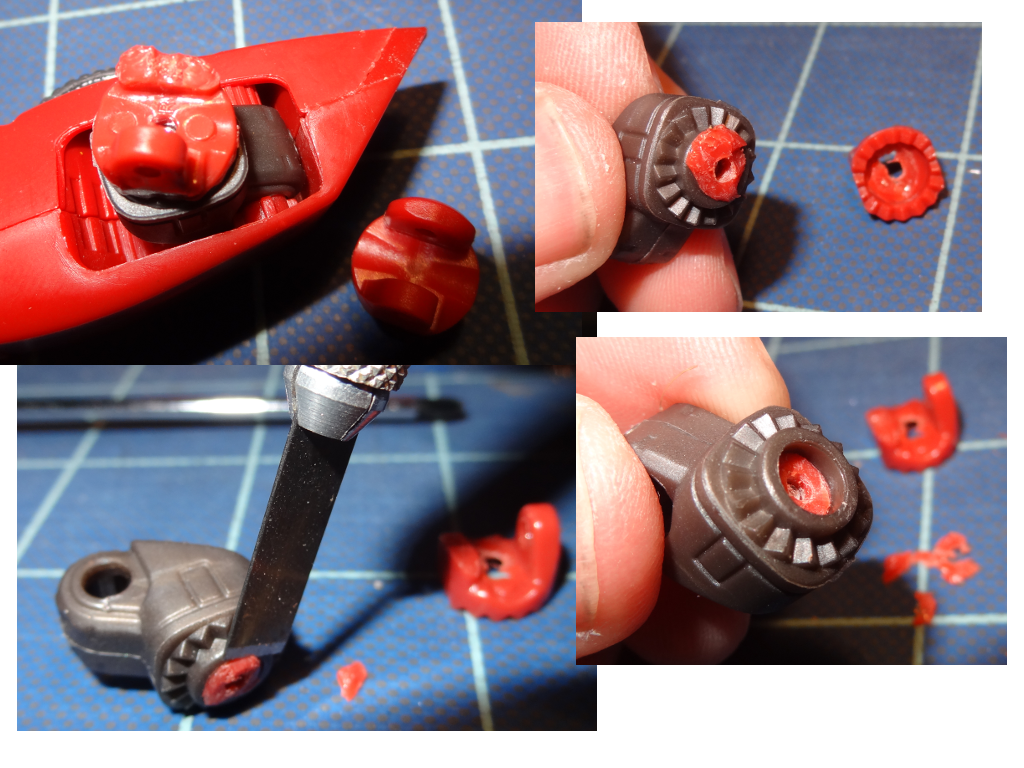
Knowing that the crown section of the broken piece is a weak point. (From reading posts on TFW2005) I gently pried until it broke off. I then used a straight X-Acto blade to shave off the remaining wide section from the top. The rest including the pressed pin and spring slid out from the other side.


I then removed the remaining plastic from the pressed pin. This is when I noticed that the hole in the replacement part was considerably smaller that the diameter of the pin.


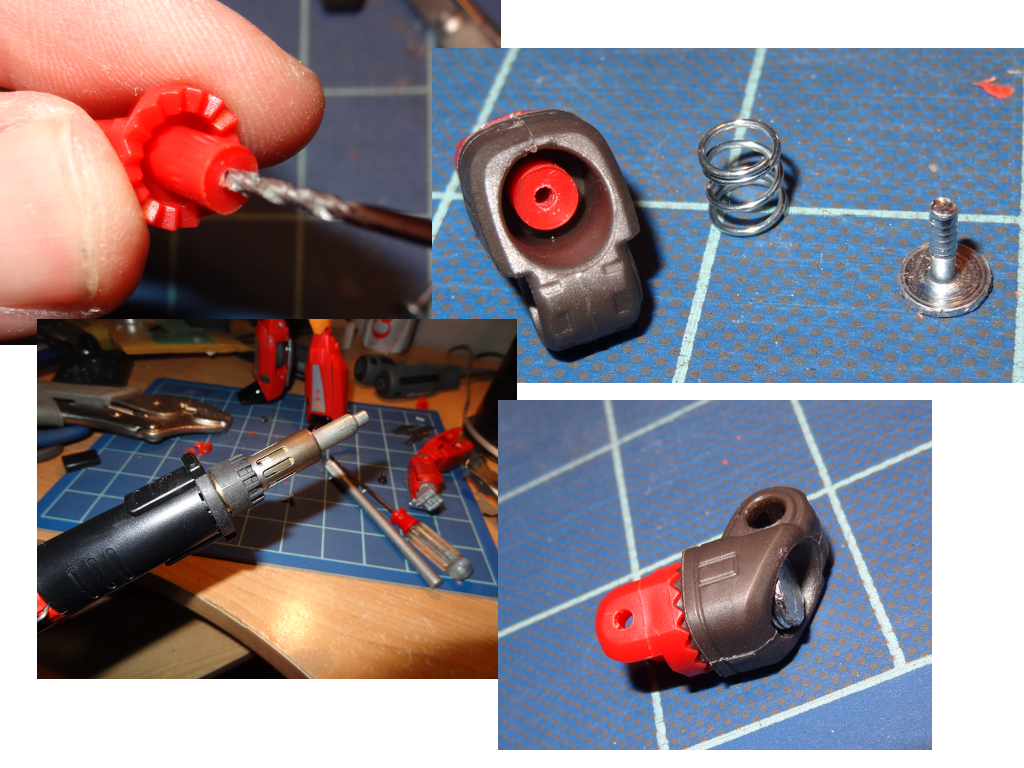
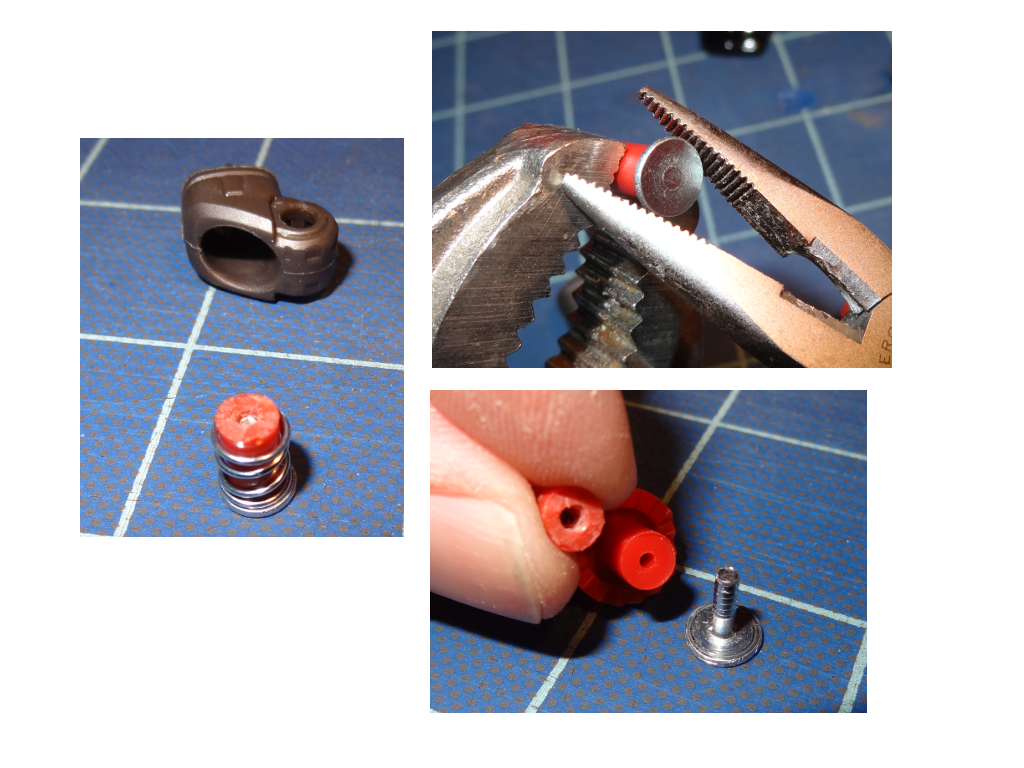
Using a 1/16" drill bit I carefully reamed the hole using my hand. The press pin is slightly larger than 1/16" so I figured that this would work well once pressed into the hole.

I put the replacement piece into the shoulder joint and put the spring into the other side.

I then used a shrink tube attachment on a butane soldering iron to heat the press pin until it was hot enough to be pushed into the hole. Not too hot that it would cause the part's shape to distort. I pressed the pin into the hole far enough to allow the spring and pin to move to allow the ratcheting action. To far in would lock the joint into place and not allow it to rotate. I compared the spacing from the other shoulder. Once the pin cooled I then reassembled the arm.


I aligned the arm back into place and replaced the shoulder pin making sure the knurl was at the top. I used gentle tapping to insert the pin as far as I was comfortable.

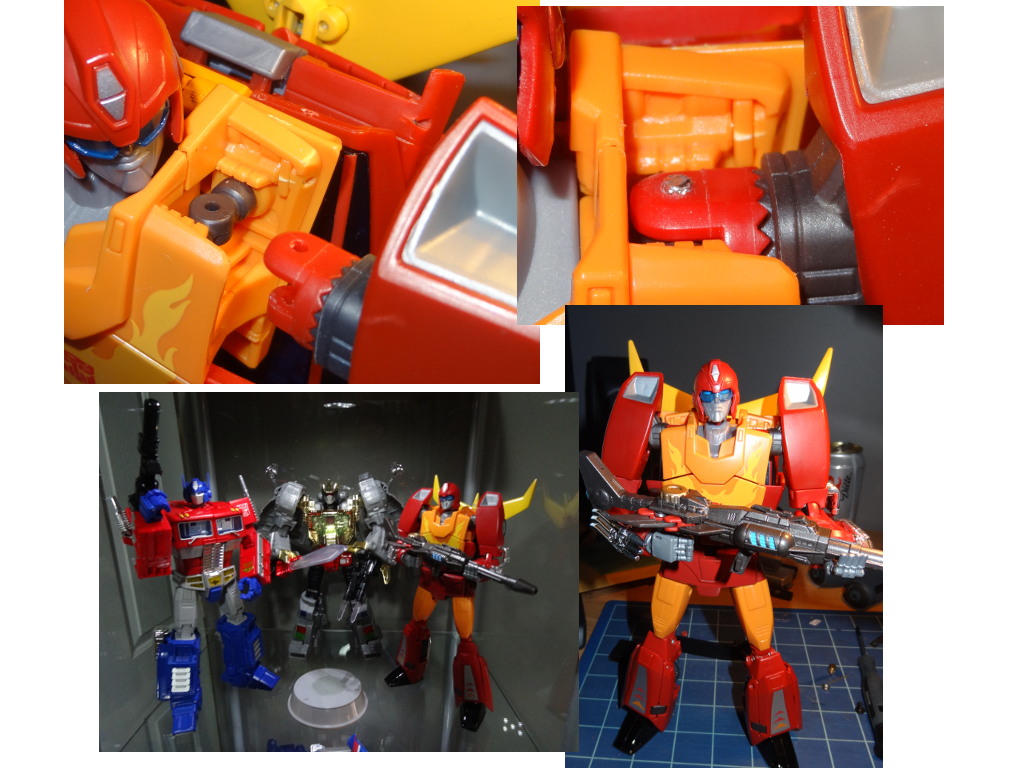
My only other note about the replacement part is that the joints ratchet teeth are not a perfect match to the original, but are good enough to work. It does not ratchet as good as the original but is a far cry better than his arm detached and at his feet.

Price to fix about $15.
__________________
:S

Last edited by Nazarite; 09-29-2014 at 09:56 AM.
Nazarite is offline   Reply With Quote
Old 09-24-2014, 11:19 PM   #2
MULTIPLEX
DECEPTICON BEATDOWN TIME!
MULTIPLEX's Avatar
Join Date: Aug 2013
Location: Autobot City - a.k.a. Guelph
Posts: 4,473
Re: Hasbro MP-09 Masterpiece Rodimus Shoulder Repair.

What an excellent tutorial. Funny you posted this. I literally also bought replacement parts for my MP-9B two days ago, but for his knee. There's even a die cast knee.

These eBay sellers have various replacement parts for 9 and 9B

http://www.ebay.com/sch/m.html?_odkw...t+rod&_sacat=0

http://www.ebay.ca/itm/281438831483?...84.m1497.l2649
MULTIPLEX is offline   Reply With Quote
Old 09-24-2014, 11:23 PM   #3
Nazarite
Masterpiece Collector
Nazarite's Avatar
Join Date: Jul 2013
Location: Nova Scotia
Posts: 299
Thumbs up Re: Hasbro MP-09 Masterpiece Rodimus Shoulder Repair.

Quote:
Originally Posted by MULTIPLEX View Post
What an excellent tutorial. Funny you posted this. I literally also bought replacement parts for my MP-9B two days ago, but for his knee. There's even a die cast knee.

These eBay sellers have various replacement parts for 9 and 9B

http://www.ebay.com/sch/m.html?_odkw...t+rod&_sacat=0

http://www.ebay.ca/itm/281438831483?...84.m1497.l2649
I am quite pleased with the product. Now I can have a little less hate in my 'Love/Hate' relationship with my Hot Rod.
__________________
:S
Nazarite is offline   Reply With Quote
Old 09-24-2014, 11:38 PM   #4
Protoman
The Legend
Protoman's Avatar
Join Date: Apr 2007
Location: Montreal (Iacon)
Posts: 11,454
Re: Hasbro MP-09 Masterpiece Rodimus Shoulder Repair.

This is a beautiful thread.

I have 3 MP-09 Hasbros on release and one of them OUT OF THE PACKAGE was already busted at the shoulder. He is currently in a makeshift alt mode. But now I can fix the issue
__________________
Grand knowledge of all things Transformers
[{o}] Till all are One
Protoman on YOUTUBE - http://www.youtube.com/TransformersSlagPodcast
Follow Protoman on TWITTER - Protoman http://twitter.com/Protoman
Protoman is offline   Reply With Quote
Old 09-25-2014, 07:46 AM   #5
steamwhistle
Crossover
steamwhistle's Avatar
Join Date: Oct 2012
Location: Niagara, Ontario
Posts: 1,430
Re: Hasbro MP-09 Masterpiece Rodimus Shoulder Repair.

I like your blue grid repair pad -- makes it look like a real robot repair bay!
__________________
.
.
"Reach for the stars, but never leave your friends."
- - - - - - - - - - - - - - - - - - - - - - - - - - - - - - - - - - - - - - - -
Feedback thread: http://www.cybertron.ca/boards/showt...t=steamwhistle
steamwhistle is offline   Reply With Quote
Old 09-25-2014, 07:53 AM   #6
Nazarite
Masterpiece Collector
Nazarite's Avatar
Join Date: Jul 2013
Location: Nova Scotia
Posts: 299
Re: Hasbro MP-09 Masterpiece Rodimus Shoulder Repair.

It's just a self healing X-Acto mat. I find it does provide a good contrast for repair photos.
__________________
:S
Nazarite is offline   Reply With Quote
Old 09-25-2014, 08:11 AM   #7
Cronosabre
Machine War
Cronosabre's Avatar
Join Date: Jul 2007
Location: Ottawa
Posts: 233
Re: Hasbro MP-09 Masterpiece Rodimus Shoulder Repair.

Thanks for posting this. I bought the same kit and got to the part where I noticed the replacement part's hole was too small for the pin and stopped. I was going to look at it again once I had more time. I was considering replacing the pin with a screw instead, but haven't got around to looking for one yet. This was the advice given by one of the TFW board members who is selling replacement shoulders that are 3D printed.

I was also a bit disappointed that the teeth didn't quite align properly with the original, but as you said it is better than the arm laying at his feet.
__________________
My Sales Thread - 3rd Party, 3rd Party Legends, TR, PoTP, Siege, TFCC
My Cybertron.ca Feedback Thread
My TFW Feedback Thread
Cronosabre is offline   Reply With Quote
Old 09-25-2014, 10:13 AM   #8
Nazarite
Masterpiece Collector
Nazarite's Avatar
Join Date: Jul 2013
Location: Nova Scotia
Posts: 299
Re: Hasbro MP-09 Masterpiece Rodimus Shoulder Repair.

Quote:
Originally Posted by Cronosabre View Post
Thanks for posting this. I bought the same kit and got to the part where I noticed the replacement part's hole was too small for the pin and stopped. I was going to look at it again once I had more time. I was considering replacing the pin with a screw instead, but haven't got around to looking for one yet. This was the advice given by one of the TFW board members who is selling replacement shoulders that are 3D printed.

I was also a bit disappointed that the teeth didn't quite align properly with the original, but as you said it is better than the arm laying at his feet.
I too was toying with using a screw to replace the pin. You can see some in the lower left pic of the fifth picture set.
I decided not to in order to try to retain the original look as much as possible. Also I had difficultly locating a screw with a wide enough head to retain the spring and small enough to fit in the hole.

I figured if I ever had to remove the pin it would likely be because the part broke again.
__________________
:S

Last edited by Nazarite; 09-25-2014 at 10:15 AM.
Nazarite is offline   Reply With Quote
Old 09-25-2014, 10:23 AM   #9
JLvatron
Chosen 1
JLvatron's Avatar
Join Date: Apr 2007
Location: Montreal
Posts: 8,107
Re: Hasbro MP-09 Masterpiece Rodimus Shoulder Repair.

Quote:
Originally Posted by MULTIPLEX View Post
What an excellent tutorial.
I fully agree with Bill and/or Ted above!

And great pics with HotRod looking at his shoulder during surgery.
You are NazaRatchet!!

Quote:
Originally Posted by steamwhistle View Post
I like your blue grid repair pad -- makes it look like a real robot repair bay!
Yes, this!!
__________________
"Don't be absurd!"
-Galvatron

JLvatron is offline   Reply With Quote
Old 09-25-2014, 11:23 AM   #10
MULTIPLEX
DECEPTICON BEATDOWN TIME!
MULTIPLEX's Avatar
Join Date: Aug 2013
Location: Autobot City - a.k.a. Guelph
Posts: 4,473
Re: Hasbro MP-09 Masterpiece Rodimus Shoulder Repair.

Quote:
Originally Posted by Nazarite View Post
It's just a self healing X-Acto mat. I find it does provide a good contrast for repair photos.
I recently purchased a similar mat for my "lab". I really appreciated the grids. Man those came in so handy when I was installing my LED strip light in my Detolfs. Perfect placement every time.

When I get my knee joint, I might add some pics here. It's a lot less complicated I believe.
MULTIPLEX is offline   Reply With Quote
Reply


Posting Rules
You may not post new threads
You may not post replies
You may not post attachments
You may not edit your posts

BB code is On
Smilies are On
[IMG] code is On
HTML code is Off

Forum Jump

Transformers Shopping


Donate to Cybertron.ca
Donations keep this site running, thanks for your support. More details here.

Powered by vBadvanced CMPS v3.2.3

All times are GMT -4. The time now is 09:50 PM.


Powered by vBulletin® Copyright ©2000 - 2024, Jelsoft Enterprises Ltd.